一、glusterfs简介
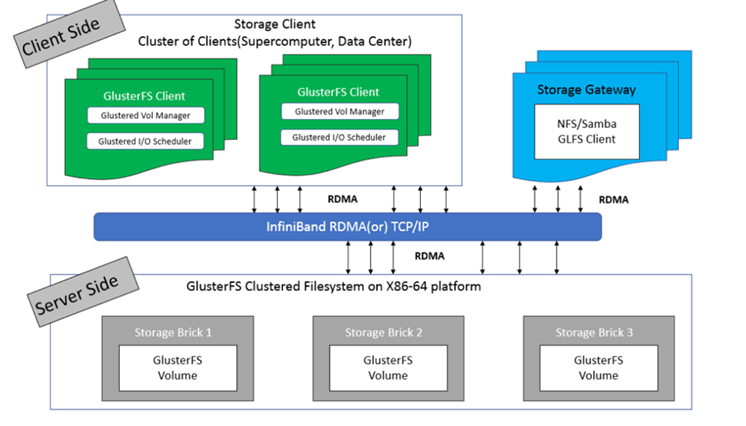
Glusterfs是一个开源的分布式文件系统,是Scale存储的核心,能够处理千数量级的客户端。是整合了许多存储块(server)通过Infiniband RDMA或者 Tcp/Ip方式互联的一个并行的网络文件系统。
GlusterFS支持运行在任何标准IP网络上标准应用程序的标准客户端,用户可以在全局统一的命名空间中使用NFS/CIFS等标准协议来访问应用数据。GlusterFS使得用户可摆脱原有的独立、高成本的封闭存储系统,能够利用普通廉价的存储设备来部署可集中管理、横向扩展、虚拟化的存储池,存储容量可扩展至TB/PB级。
文章源自小柒网-https://www.yangxingzhen.cn/4082.html
架构图
 文章源自小柒网-https://www.yangxingzhen.cn/4082.html
1.2 常见术语
文章源自小柒网-https://www.yangxingzhen.cn/4082.html
|
名称文章源自小柒网-https://www.yangxingzhen.cn/4082.html |
解释文章源自小柒网-https://www.yangxingzhen.cn/4082.html |
|
Brick文章源自小柒网-https://www.yangxingzhen.cn/4082.html |
最基本的存储单元,表示为trusted storage pool中输出的目录,供客户端挂载用文章源自小柒网-https://www.yangxingzhen.cn/4082.html |
|
Volume文章源自小柒网-https://www.yangxingzhen.cn/4082.html |
一个卷,在逻辑上由N个bricks组成文章源自小柒网-https://www.yangxingzhen.cn/4082.html |
|
Glusterd Gluster文章源自小柒网-https://www.yangxingzhen.cn/4082.html |
management daemon,要在trusted storage pool中所有的服务器上运行 |
|
POSIX |
一个标准,GlusterFS兼容 |
1.3 优势
1)无元数据服务设计,弹性HASH
2)高性能:PB级容量、GB级吞吐量、数百集群规模
3)用户空间模块化堆栈式设计
4)高可用性,支持复制和自修复
5)适合大文件存储
1.4 劣势
1)大量小文件性能表现不佳
2)复制存储利用率低
准备环境:
|
硬件环境 |
IP地址 |
CPU |
内存 |
磁盘数量 |
OS版本 |
|
node1 |
192.168.199.101 |
1 |
2 |
3 (20 10 10/G) |
CentOS 7.4 |
|
node2 |
192.168.199.166 |
1 |
2 |
3 (20 10 10/G) |
CentOS 7.4 |
|
node3 |
192.168.199.188 |
1 |
2 |
3 (20 10 10/G) |
CentOS 7.4 |
glusterfs搭建:
Node1:
#关闭selinux、iptables
[root@localhost ~]# sed -i '/^SE.*en.*/s/enforcing/disabled/'g /etc/selinux/config
[root@localhost ~]# setenforce 0
[root@localhost ~]# chkconfig iptables off && service iptables stop
#主机名设置临时生效
[root@localhost ~]# hostname node1 && su –
[root@node1 ~]# sed -i '/HOSTNAME/s/local.*n$/node1/' /etc/sysconfig/network
#主机名解析
[root@node1 ~]# vim /etc/hosts
192.168.199.101 node1
192.168.199.166 node2
192.168.199.188 node3
#时间同步
[root@node1 ~]# yum install ntpdate –y
[root@node1 ~]# ntpdate -u ntp.api.bz
Node2:
#关闭selinux、iptables
[root@localhost ~]# sed -i '/^SE.*en.*/s/enforcing/disabled/'g /etc/selinux/config
[root@localhost ~]# setenforce 0
[root@localhost ~]# chkconfig iptables off && service iptables stop
#主机名设置临时生效
[root@localhost ~]# hostname node2 && su –
[root@node2 ~]# sed -i '/HOSTNAME/s/local.*n$/node1/' /etc/sysconfig/network
#主机名解析
[root@node1 ~]# vim /etc/hosts
192.168.199.101 node1
192.168.199.166 node2
192.168.199.188 node3
#时间同步
[root@node2 ~]# yum install ntpdate –y
[root@node2 ~]# ntpdate -u ntp.api.bz
Node3:
#关闭selinux、iptables
[root@localhost ~]# sed -i '/^SE.*en.*/s/enforcing/disabled/'g /etc/selinux/config
[root@localhost ~]# setenforce 0
[root@localhost ~]# chkconfig iptables off && service iptables stop
#主机名设置临时生效
[root@localhost ~]# hostname node3 && su –
[root@node3 ~]# sed -i '/HOSTNAME/s/local.*n$/node1/' /etc/sysconfig/network
#主机名解析
[root@node1 ~]# vim /etc/hosts
192.168.199.101 node1
192.168.199.166 node2
192.168.199.188 node3
#时间同步
[root@node3 ~]# yum install ntpdate –y
[root@node3 ~]# ntpdate -u ntp.api.bz
2、安装glusterfs4.1版本(glusterfs.server默认监听端口为)(三台机同样操作)
Node1:
#下载glusterfs.repo源
[root@node1 ~]# wget -c -P /etc/yum.repos.d https://mirrors.yangxingzhen.com/yum/glusterfs.repo
[root@node1 ~]# cat /etc/yum.repos.d/glusterfs.repo
#初始化磁盘
[root@node1 ~]# mkfs.ext4 /dev/sdb
[root@node1 ~]# mkfs.ext4 /dev/sdc
[root@node1 ~]# mkfs.ext4 /dev/sdd
Node2:
#下载glusterfs.repo源
[root@node2 ~]# wget -c -P /etc/yum.repos.d https://mirrors.yangxingzhen.com/yum/glusterfs.repo
[root@node2 ~]# cat /etc/yum.repos.d/glusterfs.repo
#初始化磁盘
[root@node2 ~]# mkfs.ext4 /dev/sdb
[root@node2 ~]# mkfs.ext4 /dev/sdc
[root@node2 ~]# mkfs.ext4 /dev/sdd
Node3:
#下载glusterfs.repo源
[root@node3 ~]# wget -c -P /etc/yum.repos.d https://mirrors.yangxingzhen.com/yum/glusterfs.repo
[root@node3 ~]# cat /etc/yum.repos.d/glusterfs.repo
#初始化磁盘
[root@node3 ~]# mkfs.ext4 /dev/sdb
[root@node3 ~]# mkfs.ext4 /dev/sdc
[root@node3 ~]# mkfs.ext4 /dev/sdd
3、开始安装(三台机同步操作)
Node1:
#安装glusterfs
[root@node1 ~]# yum -y install glusterfs glusterfs-fuse glusterfs-server
#创建三块存储驱动挂载的三个路径
[root@node1 ~]# mkdir -p /data/{brick1,brick2,brick3}
#依次挂载(记得做开机自动挂载/etc/fatab文件中)
[root@node1 ~]# mount /dev/sdb /data/brick1/
[root@node1 ~]# mount /dev/sdc /data/brick2/
[root@node1 ~]# mount /dev/sdd /data/brick3/
#启动glusterfs
[root@node1 ~]# /etc/init.d/glusterd start
[root@node1 ~]# /etc/init.d/glusterd status
#查看是否加了开机自启动
[root@node1 ~]# chkconfig –list|grep glusterd
#查看主机迟中主机的状态
[root@node1 ~]# gluster peer status
Node2:
#安装glusterfs
[root@node2 ~]# yum -y install glusterfs glusterfs-fuse glusterfs-server
#创建三块存储驱动挂载的三个路径
[root@node2 ~]# mkdir -p /data/{brick1,brick2,brick3}
#依次挂载(记得做开机自动挂载/etc/fatab文件中)
[root@node2 ~]# mount /dev/sdb /data/brick1/
[root@node2 ~]# mount /dev/sdc /data/brick2/
[root@node2 ~]# mount /dev/sdd /data/brick3/
#启动glusterfs
[root@node2 ~]# /etc/init.d/glusterd start
[root@node2 ~]# /etc/init.d/glusterd status
#查看是否加了开机自启动
[root@node2 ~]# chkconfig –list|grep glusterd
#查看主机迟中主机的状态
[root@node2 ~]# gluster peer status
Node3:
#安装glusterfs
[root@node3 ~]# yum -y install glusterfs glusterfs-fuse glusterfs-server
#创建三块存储驱动挂载的三个路径
[root@node3 ~]# mkdir -p /data/{brick1,brick2,brick3}
#依次挂载(记得做开机自动挂载/etc/fatab文件中)
[root@node3 ~]# mount /dev/sdb /data/brick1/
[root@node3 ~]# mount /dev/sdc /data/brick2/
[root@node3 ~]# mount /dev/sdd /data/brick3/
#启动glusterfs
[root@node3 ~]# /etc/init.d/glusterd start
[root@node3 ~]# /etc/init.d/glusterd status
#查看是否加了开机自启动
[root@node3 ~]# chkconfig –list|grep glusterd
#查看主机迟中主机的状态
[root@node3 ~]# gluster peer status
4、配置分布式(任意一台机器上操作即可,这边测试用node1)
#加入主机池
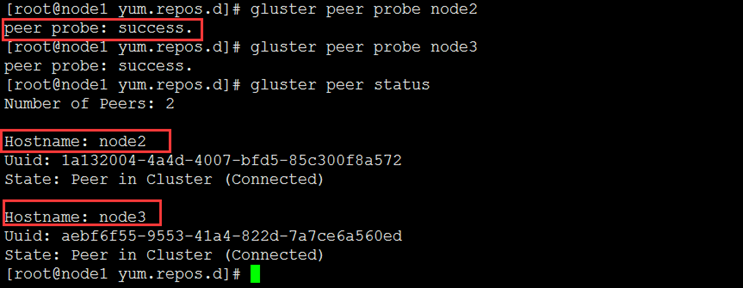
[root@node1 yum.repos.d]# gluster peer probe node2
[root@node1 yum.repos.d]# gluster peer probe node3
#创建分布式复制卷(企业推荐模式保证数据的丢失)
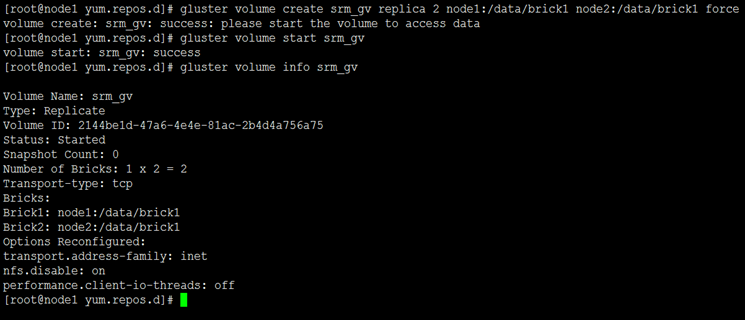
[root@node1 yum.repos.d]# gluster volume create srm_gv replica 2 node1:/data/brick1 node2:/data/brick1 force
#启动分布式卷并查看卷信息
[root@node1 yum.repos.d]# gluster volume start srm_gv
[root@node1 yum.repos.d]# gluster volume info srm_gv
#直接挂在到本机进行查看
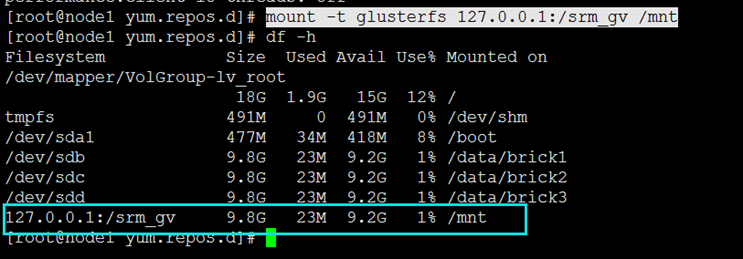
[root@node1 yum.repos.d]# mount -t glusterfs 127.0.0.1:/srm_gv /mnt
#测试分布式卷node1创建
[root@node1 mnt]# mkdir -p srmapp
[root@node1 mnt]# ls
[root@node1 mnt]# cd /data/brick1/
[root@node1 mnt]# ls
#Node2查看
[root@node2 yum.repos.d]# cd /data/brick1/
[root@node2 yum.repos.d]# ls
5、在线添加添加卷(node1操作)
Node1:
[root@node1 brick1]# gluster volume add-brick srm_gv replica 2 node1:/data/brick2/ node2:/data/brick2/ force
[root@node1 brick1]# df -h
#df -h查看,挂载上去表示扩容成功
#直接创建文件进行测试数据分布
[root@node1 brick1]# touch {1..100}.txt
[root@node1 brick1]# ls
[root@node1 brick1]# ls |wc -l
6、glusterfs常用的命令
#看下节点有没有在线
[root@node1 ~]# gluster volume status nfsp
#启动完全修复
[root@node1 ~]# gluster volume heal gv2 full
#查看需要修复的文件
[root@node1 ~]# gluster volume heal gv2 info
#查看修复成功的文件
[root@node1 ~]# gluster volume heal gv2 info healed
#查看修复失败的文件
[root@node1 ~]# gluster volume heal gv2 heal-failed
#查看主机的状态
[root@node1 ~]# gluster peer status
#查看脑裂的文件
[root@node1 ~]# gluster volume heal gv2 info split-brain
#激活quota功能
[root@node1 ~]# gluster volume quota gv2 enable
#关闭quota功能
[root@node1 ~]# gulster volume quota gv2 disable
#目录限制(卷中文件夹的大小)
[root@node1 ~]# gluster volume quota limit-usage /data/30MB --/gv2/data
#quota信息列表
[root@node1 ~]# gluster volume quota gv2 list
列出集群中所有卷
[root@node1 ~]# gluster volume list
#限制目录的quota信息
[root@node1 ~]# gluster volume quota gv2 list /data
#设置信息的超时时间
[root@node1 ~]# gluster volume set gv2 features.quota-timeout 5
#删除某个目录的quota设置
[root@node1 ~]# gluster volume quota gv2 remove /data
[root@node1 ~]# gluster volume remove-brick srm_gv replica 2 node1:/data/brick1 node2:/data/brick1 force
若文章图片、下载链接等信息出错,请在评论区留言反馈,博主将第一时间更新!如本文“对您有用”,欢迎随意打赏,谢谢!


登录回复
亲测,写的不错
登录回复